Monday, August 30, 2010

FRAMES DONE!!!

Finally at the end of the day as we are coverd in dirt and metal shavings the frames are done. 

They don't look like much now but they are strong, solid, straight, and ready to be prepped for painting.  Once we have filed and sanded off all the clumps of silver and brass we left on the frames and smoothed everything out we will bring the frames back to Tim's shop for powder coating.

Day 4 - Finishing the frame build

The frames are very close to done.  Today we are going to add the braze-ons for the water bottle cages, cable stops, the rear brake calipar, and Katrina's rack mounts. 

Since my bike is more of a racing geometry I opted not to have the rack mounts.  I am also only getting two water bottle cages. 

Katrina's bike is going to be more for road biking and some light touring so her frame will have 3 water bottle cages and rack mounts. As mentioned before has more tire clearance.
Also because the heat has caused the tubes to shrink slightly we then had to ream out the seat post tube to make sure the seat post would fit.

We also took a break to challenge Tim to a game of ping pong before finishing our bikes.  He slaughter me 4 to 21 but Katrina managed to lose by one point. 

Day 3 - Braze braze braze

On the third day we finally get a reprieve with the weather.  With temps in the triple digits last weekend we had a nice little nip in the air bringing temperatures down to the mid nineties which made the temperature perfect in the shop. 

Today we have to braze all the lugs we tacked with exception of one, the seatpost lug.  That is a tough braze and we need to have everything else done before hitting that.

Because the need for our braze to get all the way into the joint and under each lug we used silver on these sections.  Silver is tons more expensive than brass but it's easier for us novices to use so Tim has us use silver on most of the frame.

Thursday, August 26, 2010

Ordering Paint

Today we ordered the paint for the bike.  Even though we are having Tim's painter powder coat the bikes we wanted to make it look custom.  So we decided to paint all the lugs in an emerald green.  Tim told us that "1 shot paint" is excellent for doing that.   We can brush on the paint and then heat it and it will smooth out and look professional. 

In addition to that we ordered some metallic silver paint to outline the lugs.

After that we ordered some holographic metal flakes to mix with the green paint.

Monday, August 23, 2010

Day 2 - Tacking the pieces together


Now for tacking the pieces together.  We used copper and silver wire to attach all the pieces together so we could can remove it from the jig and finish brazing the rest of the bike. 

Tim is such a good instructor.  An example of how good he is.  When you have things in each of your hand what does a person normally do to grab something?....use their mouth.  I was running out of wire at one point and needed to pull more wire straight but I had the tourch in one hand and the rolled up wire in the other. 

I hadn't even moved...it just looked at it... when Tim said "don't put that in your mouth".  I would have totally burned my mouth!

Day 2 - Putting the pieces in the Jig


After getting the first triangle together we have to get the Jig set up with the proper angles.  Of course I made Katrina go first.  Tim helped us set everything up and get the first triangle in.  Then after that we put in the second triangle and lined everything up.

Katrina had to crimp her rear chain stays in order to give her more tire size options in case she wanted thicker more comfortable tires at anytime.

Day 2 - Putting the first Triangle together.

The bike frame is made of two triangles.  The front and rear triangle.  The front triangle we piece together with the lugs and for the first time we can see a bike frame starting to appear.  The white stuff you see on the frames is the flux.  we coated the joints in flux for when we braze these pieces together.

Day 2 - Cleaning up our first braze

Sunday is a hot day.  I didn't think it could get hotter than Saturday but it did.  Froze ozarka water bottles are our best friends. 

First thing for us to do was to clean up the set post stays we brazed the day before.   This part of the stay is needs cleaned up purely for astetics.  We're hoping the more we clean it now the better it will look in the long run.

We then cut the stays to the proper length and drill holes in the rear stays to serve as vents while we are brazing the bike.

Saturday, August 21, 2010

Day 1-First Braze

We stayed late to see if we could do our first braze.  This was the top of the seat stay.  The top of this will be outward facing and I was worried right away meaning people would acaully be able to see this. 

Tim walked us through it and we got all four done before leaving today.

Tim said that the hard work is done and the next three days should be more fun.  We are tired but we are excited!

Day 1-Cutting the tube.

Day 1 and we are already cutting tubes!  Too cool!
Everything was pretty easy to cut once our diagrams were made.  I was the only one who screwed up and cut a tube the wrong way.  Tim helped me fix it.  Just makes the bike lighter right!

Day 1-Design class

After we talked about what we wanted we set up some paper on our design/ping pong table (which Tim will challenge you to a game before anything starts).  Tim walked us through drawing our bikes to scale and calculating all the necessary measurements.

Of course Katrina's diagram looked much better than mine.

Day 1-Intro to the workshop

Tim gave us a little background on his shop and advised us to bring water because the workshop is not air conditioned.  He gave us very extensive directions to the shop and it's a good thing because we would have been lost otherwise.  His shop is in a warehouse of the main road behind a sign company building.

Both Katrina and I didn't sleep very well night before Day 1.  I think we both were too excited.  We went for our Saturday run at 6:30AM today to make sure we would bring everything we needed.  We packed water, cameras, the forks, and headset.  I even brought GPS in case we couldn't find the shop for whatever reason.

Now for what we forgot.
We took measurements 3 times along with hiring someone to measure us...forgot that information.   Also forgot my checkbook.  Damn it!
Tim was nice and luckily there had been enough discussion between us over the past few weeks we figured out what we needed. 

We sat down and talked for a while about what kind of bikes we wanted.

We decided that Katrina's bike will be designed for comfort, light touring, and road biking.  My bike on the other hand will be a more aggressive design for racing.  Tim knew the angles for each.

Katrina's bike will allow up to 700x32.  I will have a 7 inch bottom height with seat tube angle of 72.5 degrees and head tube angle of 72 degrees.  My bike will have a 6 in bottom height with a seat tube angle of 73.5 degrees and head tube of 74 degrees.  Are forks have a rake of 45.

Wednesday, August 18, 2010

Catbird Seat

"The catbird seat" is an idiomatic phrase used to describe an enviable position, often in terms of having the upper hand or greater advantage in all types of dealings among parties. According to the Oxford English Dictionary,[1] the first recorded usage occurred in a 1942 humorous short story by James Thurber titled "The Catbird Seat,"[2] which features a character, Mrs. Barrows, who likes to use the phrase. Another character, Joey Hart, explains that Mrs. Barrows must have picked up the expression from Red Barber and that to Barber "sitting in the catbird seat" meant "'sitting pretty,' like a batter with three balls and no strikes on him."

Tuesday, August 17, 2010

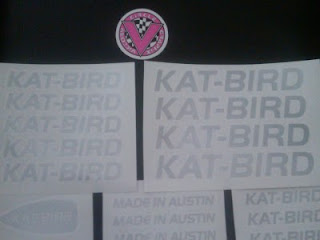
Decals are IN!!!!


The Decals came in today.  We couldn't think of a name so we combined my nick name and part of Katrinia's name to come up with Kat-Bird.  We ordered silver and hopefully they will look good with the paint job we put on. Yes that is Katrina's big toe!

Monday, August 16, 2010

Schedule for the workshop

The workshop is coming up.  Both Katrina and I are excited.   Tim sent the schedule to us today.

Tentative schedule:
Day 1--Drawing, cutting all tubes, brazing seat stay caps
Day 2--Final prep, jig setup, tacking frames
Day 3--Brazing main joints, aligning
Day 4--braze ons, aligning, reaming, facing, tapping, etc.

We start at 11am and end at 5pm every day.  Hopefully we can get a workout in before we head to the workshop.

Thursday, August 12, 2010

Sizing for the Bikes

Orginally was received a fitting from my LBS that sold Italian bikes.  I was fitted for my bike and for a future bike.  Well there is a huge difference between Italian bikes and other bikes.  I thought it was a little strange that I was sized for a 57cm frame being as I am almost 6'3".  However the adjustments he made to my current bike felt wonderful so I didn't question it. 

When we decided to build these frames I told Katrina to go to the same place because they did an excellent job.  She was measured for a 51cm bike.  Now I know that's wrong because she is 5'9". 

Well it turns out after talking to my friend Raul that the italian bikes have a different geometry so the measurements we did will be of little use in this build.  The contact points will be the same (seat, handlebars, and pedals) but the bike configuration will be different.

So we had to take measurements on our own and follow the build form on Sanner Cycles website.  Last night we did the measurements a couple of times over and I am going to send them to Tim and see what he comes up with as far as size.

Also Competitive Cyclist has a wonderful Fit Calculator.

Headsets Ordered


Since we are going with Green we decided to order a green headset similar to my Chris King headset on my current bike.  The FSA headset is half the price of the Chris King so we are going to give these a try.  That's it as far as ordering parts.  I really don't want to buy anything else until the frame is built.

Wednesday, August 11, 2010

Steel Forks


We ordered forks last week and they came in Friday.  These are just standard black steel forks.  Not a whole lot of wheel clearance but $50.  We purchased the 1 and 1/8 inch threadless forks from a local bike shop.  Just in case we wanted to change to a more modern fork later.  I will say the thing is heavy.  Hopefully we can cut some off once the installation is done.  The dimensions are as followed:
Manufacturer: Dimension
MFR's Part #: 8277FD1-300
UPC: 708752059474
Model: Dimension 700c Road
Color: Black
Material: CroMo
Steerer Tube: 1-1/8" Threadless
Fork Rake: 50mm
Axle to Crown Length: 374mm
Crown Race: 27
Steerer Tube Length: 300mm
Wheel Size: 700c
Front Hub Spacing: 100mm
Front Axle Type: 9x1

The Look of the Bikes

http://www.vcgraphix.com/
Now a days road bikes are so custom for people that I rarely see people riding matching bikes.  As we wait for our class to start we are talking about colors and logos for the bikes.  We want the bikes to match completely like in the old days when couples would buy matching steel bikes from the local schwinn dealer.  So Katrina found a website where we could order decals.  You don't have a whole lot of artistic options but price is good.   So far our paint scheme is off white with green lugs.  This is all provided that the frames actually turn out.